Do not activate nDivia frame buffer in kernel!
vga=0x318 video=vesafb:mtrr:3,ywrap on grub
Do not activate nDivia frame buffer in kernel!
vga=0x318 video=vesafb:mtrr:3,ywrap on grub
1. Get vmware rpm server from http://www.vmware.com
2. Install vmware rpm
ns2 ~ # rpm -ivh VMware-server-1.0.7-108231.i386.rpm
3. Configure vmware with vmware-config.pl
ns2 ~ # /usr/bin/vmware-config.pl
agree license and where it says
“None of the pre-built vmmon modules for VMware Server is suitable for your
running kernel. Do you want this program to try to build the vmmon module for
your system (you need to have a C compiler installed on your system)? [yes] yes
Using compiler “/usr/bin/gcc”. Use environment variable CC to override.
Your kernel was built with “gcc” version “4.3.1”, while you are trying to use
“/usr/bin/gcc” version “4.3”. This configuration is not recommended and VMware
Server may crash if you’ll continue. Please try to use exactly same compiler as
one used for building your kernel. Do you want to go with compiler
“/usr/bin/gcc” version “4.3” anyway? [no] yes
expect scripts for automated login with ssh connection.
#!/usr/bin/expect
set timeout 60
set PASS xxxxx
spawn /usr/bin/ssh root@ns2
expect “Password: “; send “$PASS\r”
interact
To check File IO, this iotop is one of best solution.
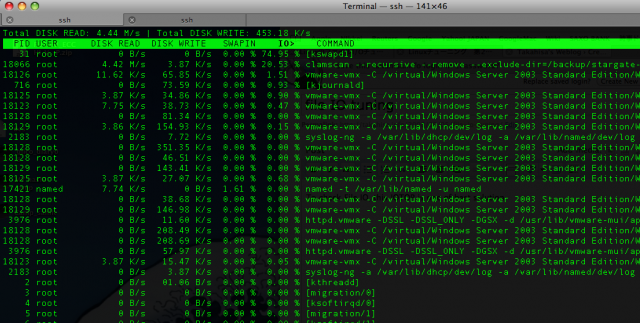
“Linux has always been able to show how much I/O was going on (the bi and bo columns of the vmstat 1 command).
For Suse 11
Simply type “yum install iotop”.
Iotop’s homepage
http://guichaz.free.fr/iotop/
To change default file permission in linux or unix modify login.defs or use umask command.
if you like to have 700 as default, umask or login.defs umask will be 777 – 700 = 077.
OpenSuse 11 or 10, is always do ls -al even just type ls with root accounts.
To avoid this, follow this step.
1, Open /etc/bash.bashrc
2, Modify where about line 88 says
LS_OPTIONS=”-A -N $LS_OPTIONS -T O”
remove -A from this.
3, save file
Done!
Downloading BitTorrent on Linux without GUI.
1. Install BitTorrent
$ yum -y install bittorrent
2. get torrent that you want to download
3. let start download bittorrent
$ bittorrent-curses ‘http://www.mininova.org/get/some_file[222].torrent’
or
$ bittorrent-curses ‘some_file[222].torrent’
Requirements :
You must have Python 2.3 above.
to check version of Python simply type python -V from command line
Software :
http://download.bittorrent.com
When you setup domain with virtualmin, sometime you want to change after while.
eg., administrative username
modify domain(s) without re-setup entire domain(s), edit following file.
1. [root@ns99 ~]# cd /etc/webmin/virtual-server/
2. [root@ns99 virtual-server]# cat sample.local.act
change sample.local as your domain name
3. see where it says domains=117160406314152
remember number of domains.
4. [root@ns99 virtual-server]# cd domains/
5. [root@ns99 domains]# vim 117160406314152 number you find before.
6. edit and save. done!
When use mysql from console, it is easy if we can load sql from a file.
to do this with mysql.
mysql > source filename.sql
How to install php 5 on CentOS 4.
1. Modify vi /etc/yum.repos.d/CentOS-Base.repo
#additional packages that extend functionality of existing packages
[centosplus]
name=CentOS-$releasever – Plus
mirrorlist=http://mirrorlist.centos.org/?release=$releasever&arch=$basearch&repo=centosplus
#baseurl=http://mirror.centos.org/centos/$releasever/centosplus/$basearch/
gpgcheck=1
#enabled=0
enabled=1 ←Change it to 1
gpgkey=http://mirror.centos.org/centos/RPM-GPG-KEY-centos4
#contrib – packages by Centos Users
[contrib]
name=CentOS-$releasever – Contrib
mirrorlist=http://mirrorlist.centos.org/?release=$releasever&arch=$basearch&repo=contrib
#baseurl=http://mirror.centos.org/centos/$releasever/contrib/$basearch/
gpgcheck=1
#enabled=0
enabled=1 ←Change it to 1
gpgkey=http://mirror.centos.org/centos/RPM-GPG-KEY-centos4
2. yum -y update php or yum -y update
3. if no error, it done.